Engineered flooring repair can make a significant difference in the appearance and durability of your floors. If you’re dealing with scratches, dents, or other types of damage, it’s possible to restore engineered floors to look as beautiful as they did when first installed. As a flooring service company, we at Wood Flooring Masters understand the importance of maintaining and repairing engineered flooring for long-lasting appeal.
Why Choose Engineered Flooring Repair?
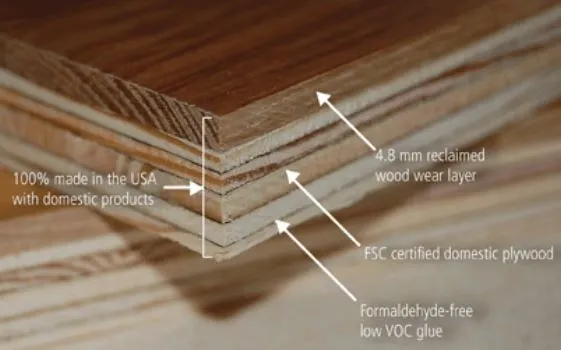
Engineered flooring is a popular choice for its resilience, beauty, and ease of installation. Unlike traditional hardwood, it consists of layers of wood veneer over plywood, making it more resistant to moisture and temperature changes. However, like any flooring, it may show signs of wear and tear over time. Whether it’s surface-level damage or deeper issues, professional engineered flooring repair is the answer to restore its natural beauty.
Common Issues Requiring Engineered Flooring Repair
Knowing the common problems in engineered floors can help you address them early, ensuring they don’t worsen over time. Here are a few signs that your floors might need repair:
Scratches and Scuffs

Everyday use can lead to light scratches and scuffs, especially in high-traffic areas. While these may seem like minor flaws, they can accumulate over time, detracting from the overall look of your flooring.
Water Damage

Engineered wood is more resistant to water than traditional hardwood, but it’s not waterproof. Spills, leaks, and moisture can still cause damage. If you notice warping or discolored spots, it’s time to consider repair.
Sun Fading
Sunlight can cause engineered flooring to fade over time, particularly in rooms with large windows or lots of natural light. While fading doesn’t impact functionality, it may leave you wanting a refreshed look.
Gaps Between Planks

Temperature and humidity fluctuations can cause engineered floors to expand and contract, sometimes resulting in gaps between planks. Repairing these gaps not only enhances appearance but also prevents debris from getting trapped.
Benefits of Engineered Flooring Repair
Opting for engineered flooring repair has multiple advantages. It can extend the life of your floors, maintain their beauty, and save you the cost of replacing the entire floor. Repairing issues early also ensures that small problems don’t turn into costly repairs down the road.
Engineered flooring repair also offers a sustainable option by preserving your existing materials. Choosing repair over replacement reduces waste and conserves resources, making it an environmentally friendly choice.
Simple Solutions for Engineered Flooring Repair
While there are DIY solutions for minor issues, professional engineered flooring repair services can handle the job with greater expertise and precision. Here are some simple repair techniques often used:
Surface Buffing and Recoating: For floors with minor scratches or a dull finish, buffing and recoating can make a substantial difference. This process removes light imperfections and restores shine without affecting the wood beneath.
Spot Treatments: For localized damage like deep scratches, spot treatments can help. A professional can carefully treat these areas to blend seamlessly with the rest of the floor.
Color Restoration: Sun-faded floors can benefit from color restoration services, which bring back the original look and make the floor appear revitalized.

Preventing Future Damage
Prevention is key to reducing the need for frequent engineered flooring repair. Here are some steps you can take to keep your floors looking new:
Use Protective Pads: Place felt or rubber pads under furniture legs to reduce the chances of scratches.
Control Indoor Humidity: Maintaining consistent indoor humidity prevents excessive expansion and contraction, which can lead to gaps.
Avoid Excessive Water: Use only damp mops and avoid standing water, as moisture can still affect engineered wood over time.
Use Rugs in High-Traffic Areas: Placing rugs or runners in areas that experience heavy foot traffic, like entryways and hallways, helps minimize wear and tear on your floors.
Bring Back the Beauty of Your Engineered Floors
Engineered flooring repair can transform your worn-out floors back to their original beauty. At Wood Flooring Masters, we’re ready to tackle all types of engineered flooring issues with precision and care. Whether you need minor touch-ups or a full restoration, our team is here to help. Contact us today to give your engineered floors a fresh new look that enhances the warmth and elegance of your home.

BLOG CATEGORIES
- Aftercare Essentials (7)
- Common Flooring Issues (3)
- Design & Style Inspiration (11)
- Healthy Flooring (4)
- Installation Insights (3)
- Material Spotlights (13)
- Pet-Friendly Flooring (3)
- Project Preparation (10)
- Real-Life Renovation Stories (442)
BLOG TAGS
Baseboard Bona traffic Buff & Coat Buffing Carpet Dustless Dustless Sanding eco-friendly Eco-Friendly Flooring Engineered floor Engineered Hardwood Finishing Herringbone High Gloss Finishing installation laminate laminate flooring Maintenance Matte Finishing natural No Stain Oil-Based Polyurethane parquet Prefinished Prefinished Hardwood Red Oak Refinishing Removing Old Hardwood Repair / Fix replace sanding satin Satin Finishing Semi-Gloss Finishing Shoe Molding Stain stair Subfloor vinyl Vinyl plank flooring Water-Based Polyurethane Water-Based Polyurethane No Stain Water Damage White Oak wood filler